
Port Forwarding in pfSense (NAT Rule Setup) #
To allow access to a specific port or forward a port to a private/internal machine, you need to create a NAT rule in pfSense. Follow the steps below:
Step 1: From the top navigation bar, click on Firewall.
Step 2: Then, select NAT from the dropdown menu.
This will open the NAT configuration page where you can define port forwarding rules.
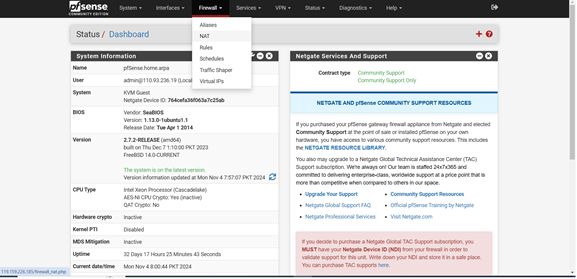
Step 3: Access the NAT Rules Page
On the NAT page, you will see a list of existing rules (which may be empty if no rules are created yet).
- Click the Add (+) icon to create a new port forwarding rule.
This will open the rule configuration page where you can define the details for port forwarding.

Step 4: Configure Basic Rule Settings
In the rule configuration page:
- Set Interface to WAN — this means the rule will apply to incoming traffic from the internet.
- Set Address Family to IPv4 — use this unless you are specifically working with IPv6.
These settings ensure the rule applies to standard public-facing IPv4 traffic.

Step 5: Configure Protocol and IP Settings
- Protocol: Select TCP, UDP, or TCP/UDP depending on which protocol the service on your internal machine (ECS instance) uses.
For example, use TCP for web servers (HTTP/HTTPS), UDP for services like DNS or VoIP. - Source: Leave this as Any if you want to allow connections from all public IPs on the internet.
This is useful if you’re not restricting access to specific IPs. - Destination: Enter your Public (WAN) IP address — the IP assigned to your firewall, listed in the Environment Details Sheet provided by iVolve-Cloud.
- Redirect Target IP: Enter the Private IP address of your internal machine (your ECS instance) to which traffic should be forwarded.
- Interface: Should remain WAN, as the traffic is coming from the outside (internet).
This configuration tells pfSense to forward incoming traffic on a specific port to your internal system based on protocol and destination IP.
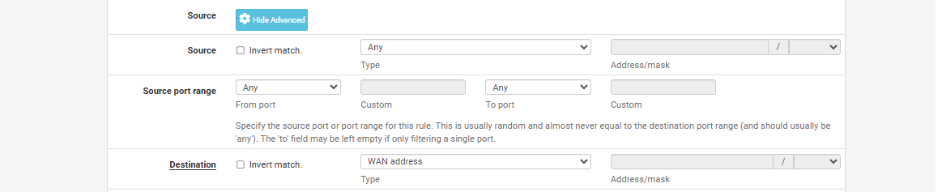
Step 6: Choose Your Port Mapping Type
At this point, you need to decide how the port forwarding should work:
If you want many-to-one port mapping (also called Port Address Translation – PAT), you can configure the firewall so that:
- Any incoming traffic from the Internet on a port range (e.g., ports 80 to 90)
- Is automatically forwarded to .g., port 80) on your internal iVolve-Cloud instance.
This is useful when multiple external ports are mapped to one specific internal port on your server.
Your configuration in this case will look like:
- Destination Port Range: From 80 to 90
- Redirect Target Port: 80
- Redirect Target IP: [Private IP of your ECS instance]
- NAT Type: Port Forwarding (PAT)
This is called Many-to-One Port Mapping, where multiple public ports map to one private service port.

Step 7: One-to-One Port Mapping (Direct Port Forwarding)
If you want a one-to-one mapping, where:
- Any incoming traffic from the Internet on port 80 is directly forwarded to port 80 on your private ECS instance,
Then configure the NAT rule like this:
- Destination Port Range: From 80 to 80
- Redirect Target Port: 80 Redirect Target IP: [Private IP of your ECS instance]
- NAT Type: Port Forwarding (One-to-One)
This is called One-to-One Port Mapping, where the public port and private port are the same.
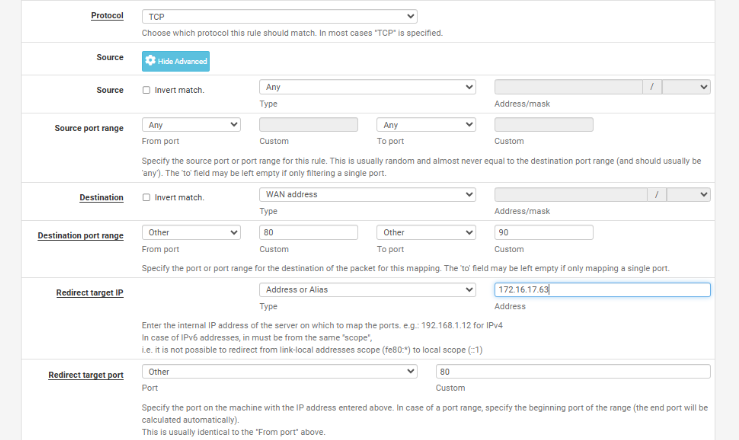
Step 8: Finalize and Save the Port Forwarding Rule
- In the Destination Port Range, enter 80 as both the From and To port values.
This tells pfSense to only allow traffic on port 80 (no range). - Redirect Target IP: Enter the private IP address of the internal machine (your ECS instance).
- Redirect Target Port: Enter the port number on which the service is running inside your private machine (e.g., 80 for a web server).
- Add a Description to help you identify this rule later (e.g., “Web server port 80 forwarding”).
- Finally, click Save.
Your port forwarding rule is now created and saved. pfSense will begin forwarding traffic based on the rule you’ve configured.
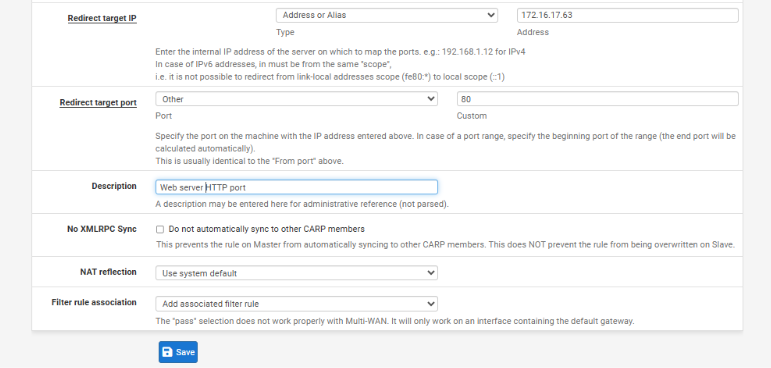
Step 9: Apply the Rule
After saving, you will see your newly created NAT rule listed at the bottom of the list.
- Click Apply Changes at the top of the page to activate the rule.
Once applied, pfSense will start forwarding traffic as per the rule.

Step 10: Accessing the Service
Your private service is now exposed to the internet.
This means it can be accessed from anywhere using your public IP address on port 80.
For example:
http://[Your Public IP]:80
Make sure the service inside your private machine is running and listening on the specified port.